I am a very practical person, so all my blog entries wil oni touch lightly of the theory, but more into making ppl understand the very basic of photography. All the words/terms/jargons wil be as simple as possible in order for all to understand. (the truth is, me myself oni noes about the simple things too.. :-P)
Wat is ISO in photography?
In photography, ISO refers to the sensitivity of film/camera sensor to light. In the 'ancient' time, photographers used films of various ISO in different condition. In simple, during a sunny day film wit ISO 100 will be used while taking photo indoor needs film wit ISO 400 and above. The cumbersome of changing films in different situation has been made easier as ISO can be switched within a few touches on the camera. However in both cases, higher sensitivity (higher ISO) leads to reduced image quality. A photo taken using high ISO wil haf increase noise/film grain.
The two photos below were taken using P mode (camera decides both shutter and aperture to achieve proper exposure, the normal brightness).

ISO 100
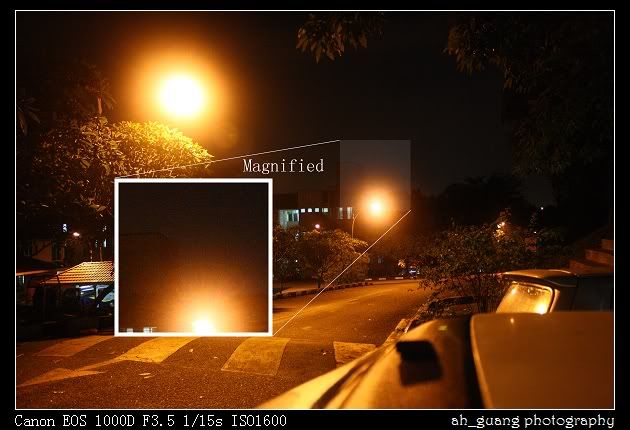
ISO1600

Direct comparison of magnified area. Left: ISO 100; right: ISO 1600
Try to observe the magnified area in both photo. Photo wit ISO 1600 looks more grainy/wit more noise than ISO 100. If u observe clearly, u would see spots in the magnified ISO 1600 but it is more smooth in ISO 100. In normal cases, image quality in ISO 100 would most certainly be preferred by all (except for Lomography).
If the image quality of photo taken wit ISO 100 is better than ISO 1600, then why is ISO 1600(or high ISO) invented?
Well, u had probably noticed in the exif of the photo, ISO 100 had a slower shutter speed (1.3s) then ISO 1600 (1/15s). In low-light situation, ISO 100 requires a slower shutter speed as the light sensitivity is low. Longer shutter time leads to hand-shake(witout the use of tripod) or motion-blur. Higher ISO can be used to increase shutter speed and hence reducing hand-shake/motion-blur.
Conclusion:
low ISO>>>>slower shutter speed + high image quality
high ISO>>> faster shutter speed + lower image quality
Balance between ISO and image quality muz be achieved and tis normally depends on the requirement of photographer and the purpose of the image is taken.
Tats all for today lo! Any question?
Read more...


